- Click on the row for the Upload task you want to edit.
- Select the Edit button.
The Upload Task allows submitters to upload files based on predefined criteria, such as file type, size limits, and required fields. It can be customized with multiple upload slots, opt-out options, and title or caption fields
The following instructions will guide you through editing and activating an Upload task after it has been added from the Task Index. For help on how to add a task, please refer to the Add a New Task help tip.
To edit an Upload task, follow these instructions:

- Update the Task Title to the task name you want the submitter to see on the live Scorecard.
- Choose which Submission Types this task should be filtered to.

You may choose to edit additional fields within the task settings. The gray text next to each setting provides guidance on where each field or text will appear on the Scorecard.
NOTE
Not all settings listed in this article may be applicable to your Scorecard.
Task Summary and Instructions
The Task Summary provides a brief overview of the task that will appear on the submitter's task list. In the Primary Instructions field, you can write detailed instructions for the task that submitters will see.

Add all necessary Upload Slots
To enable an Upload Slot, select the desired upload type from the dropdown menu for each slot used in the task.
Choose whether the Upload Slot should be On (Optional) or Required from the dropdown selection.
Enter a Field Label and specify the allowed file extensions for the Upload Slot. If "Any File Type" is selected in the Upload Type drop-down, you can specify the accepted file types by selecting them from the last drop-down menu

MOBILE APP NOTE
If your Scorecard data will be migrating to an Education Harvester and used in the Mobile App, please follow these guidelines:
- Images collected in the Scorecard that will be rendered on the Mobile App MUST be collected as .PNG or .JPG files.
- If you are using the ePoster gallery on the Mobile App, the ePoster MUST be collected as a ONE-PAGE PDF file. Multiple page PDFs will not be rendered on the ePoster gallery.
- All other file types will display as a link.
For further clarification, please reach out to your Project Manager.
Opt Out Option
If any Upload Slots are enabled or marked as required, you can allow submitters to opt out of the Upload Task by setting the opt-out option to Yes.

Maximum File Size
To restrict the file size of submissions, set a maximum file size (in KB) for this field. The recommended limits are 20,000 KB for photos, 30,000 KB for PDFs, and 250,000 KB for videos.

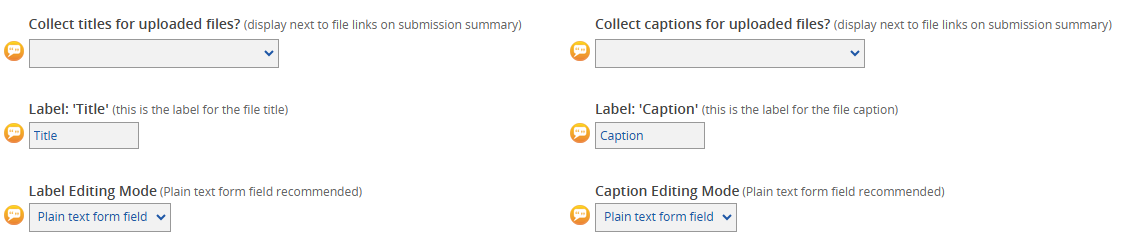
Collect titles and captions for uploaded files
To collect titles and/or captions, adjust the dropdown menus and fields as shown in the screenshot below.
- Activate the Task by changing the the status from Inactive to Active using the status drop-down menu.
- Then, update the Task Order to determine the position of the task on the submitter’s task list.
- Select Update Task in the upper right corner of the page to save your changes. If any required fields are missing, a warning message will appear at the top of your screen.

NOTE
If you have created an Upload task for specific Submission Types and want to reuse the same task for a different Submission Type with minimal edits, please refer to the Duplicating and Filtering Tasks article for instructions.
Once the Upload task(s) have been added, edited, and filtered, test your Submission Site by logging in as a user on the Scorecard.
If you have any questions, please contact your Project Manager.
Last modified Mar 03, 2025
Was this article helpful?
That’s Great!
Thank you for your feedback
Sorry! We couldn't be helpful
Thank you for your feedback
Feedback sent
We appreciate your effort and will try to fix the article