- Navigate to your Tasks list.
- Select the Disclosures Task (either (Submission-Based or Event-Based) and then select Edit from the pop-up menu.
The Disclosures Task is designed to collect financial disclosures and identify potential conflicts of interest from submission authors. This task can be configured to apply to either the lead author or all submission authors at both the submission and event levels. Regardless of the number or type of submissions or their perceived relevance, each author must disclose all financial relationships.
There are two types of Disclosures Tasks:
- Submission-Based Disclosures Task – Requires the lead author or all submission authors to submit a separate disclosure for each submission.
- Event-Based Disclosures Task – Collects a single disclosure covering the entire event rather than individual submissions. This option is recommended for compliance with ACCME guidelines or to manage disclosure information effectively.
Follow these steps to create either a Submission-Based or Event-Based Disclosures Task:
Before configuring the task, ensure that:
- The task is added from the Task Index.
- The Financial Relationship Library is populated with all possible financial relationships.
- An active Author Task is in place to collect disclosures.
Configuring the Disclosures Task

- Enter the Title as it should appear on the live Scorecard site.
- Set a Due Date (users can submit disclosures after this date, but it will appear in red as overdue).
- Set Task Status to Active.
- Enter a number in the Task Order box to determine its position in the user's task list.

- Edit the Main Instructions to include event-specific details such as name, requirements, or other important information.
NOTE
You can use basic HTML tags (<B> </B> for bold text, <I> </I> for italics, etc.) if needed.
- Add optional Landing Page Instructions and provide a Disclosure Policy Document Title and URL if required.
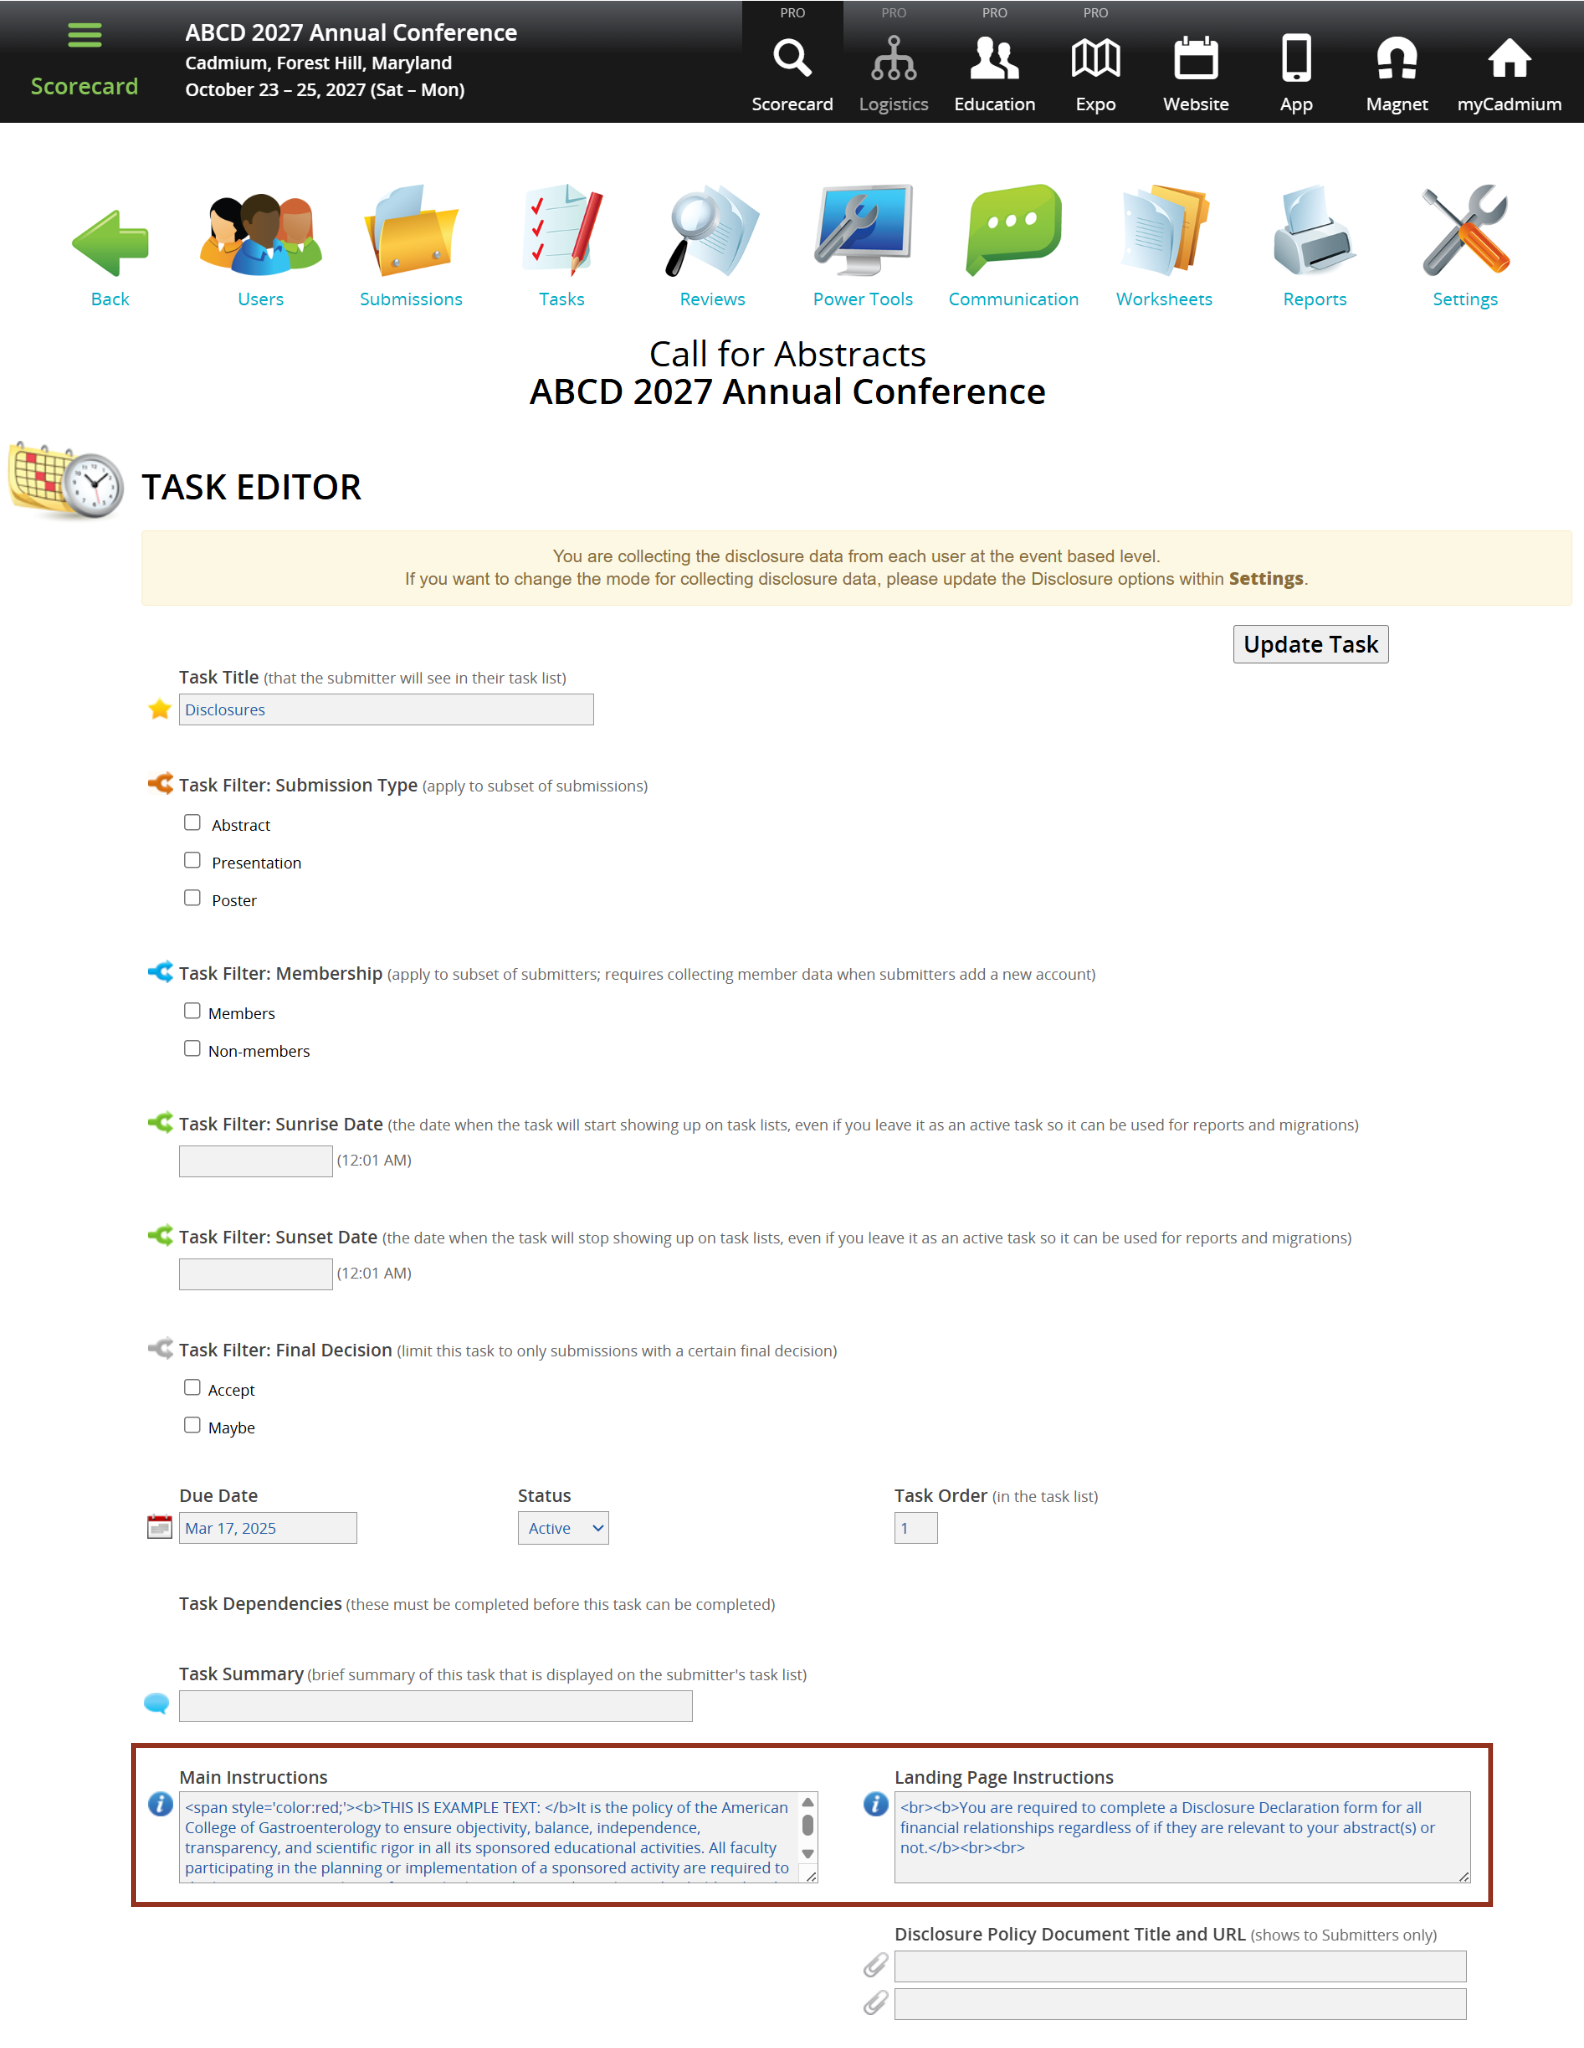
Add Filters
Filters control who receives the task. If assigning the task to all users, skip this section and proceed to Multi-Author Completion.
Submission Filters
- Configure Submission Type and Submission Category filters in Settings > Submission Options.
- Select checkboxes to assign the task based on submission type or category.
Membership Filter
- Use the Membership Filter to assign tasks based on membership status (members vs. non-members).
Sunrise & Sunset Dates
- Sunrise Date: Set when the task becomes visible.
- Sunset Date: Set when the task is hidden from users.

Multi-Author Completion
Enable this setting to allow submitters to invite co-authors to complete their own disclosures.
Enabling Multi-Author Completion
- Toggle Turn on multi-author completion to Yes. This will send an email to invited authors with a link to complete the task.
- Configure the following options:
- Set the Lock multi-author submitter data entry unless they are author toggle to No to allow submitters to complete the disclosure task on behalf of the submission authors.
- Set Suppress invitations options inside the task to Yes if your Scorecard has multi-author tasks and you would like authors to be invited to complete tasks within other tasks.
- Set the Prohibit submitter from seeing author forms toggle to Yes if you do not want the submitter to see the author forms.
- If you would like to apply multi-author completion only to authors with certain roles, use the Role Filter box to enter those roles exactly as they are listed in the Author Task.

Configuring the Disclosure Form
The disclosure form consists of:
- Disclosure Declaration: Authors confirm whether they have financial relationships to disclose.
- Financial Relationship Details: Authors provide details on disclosed relationships.
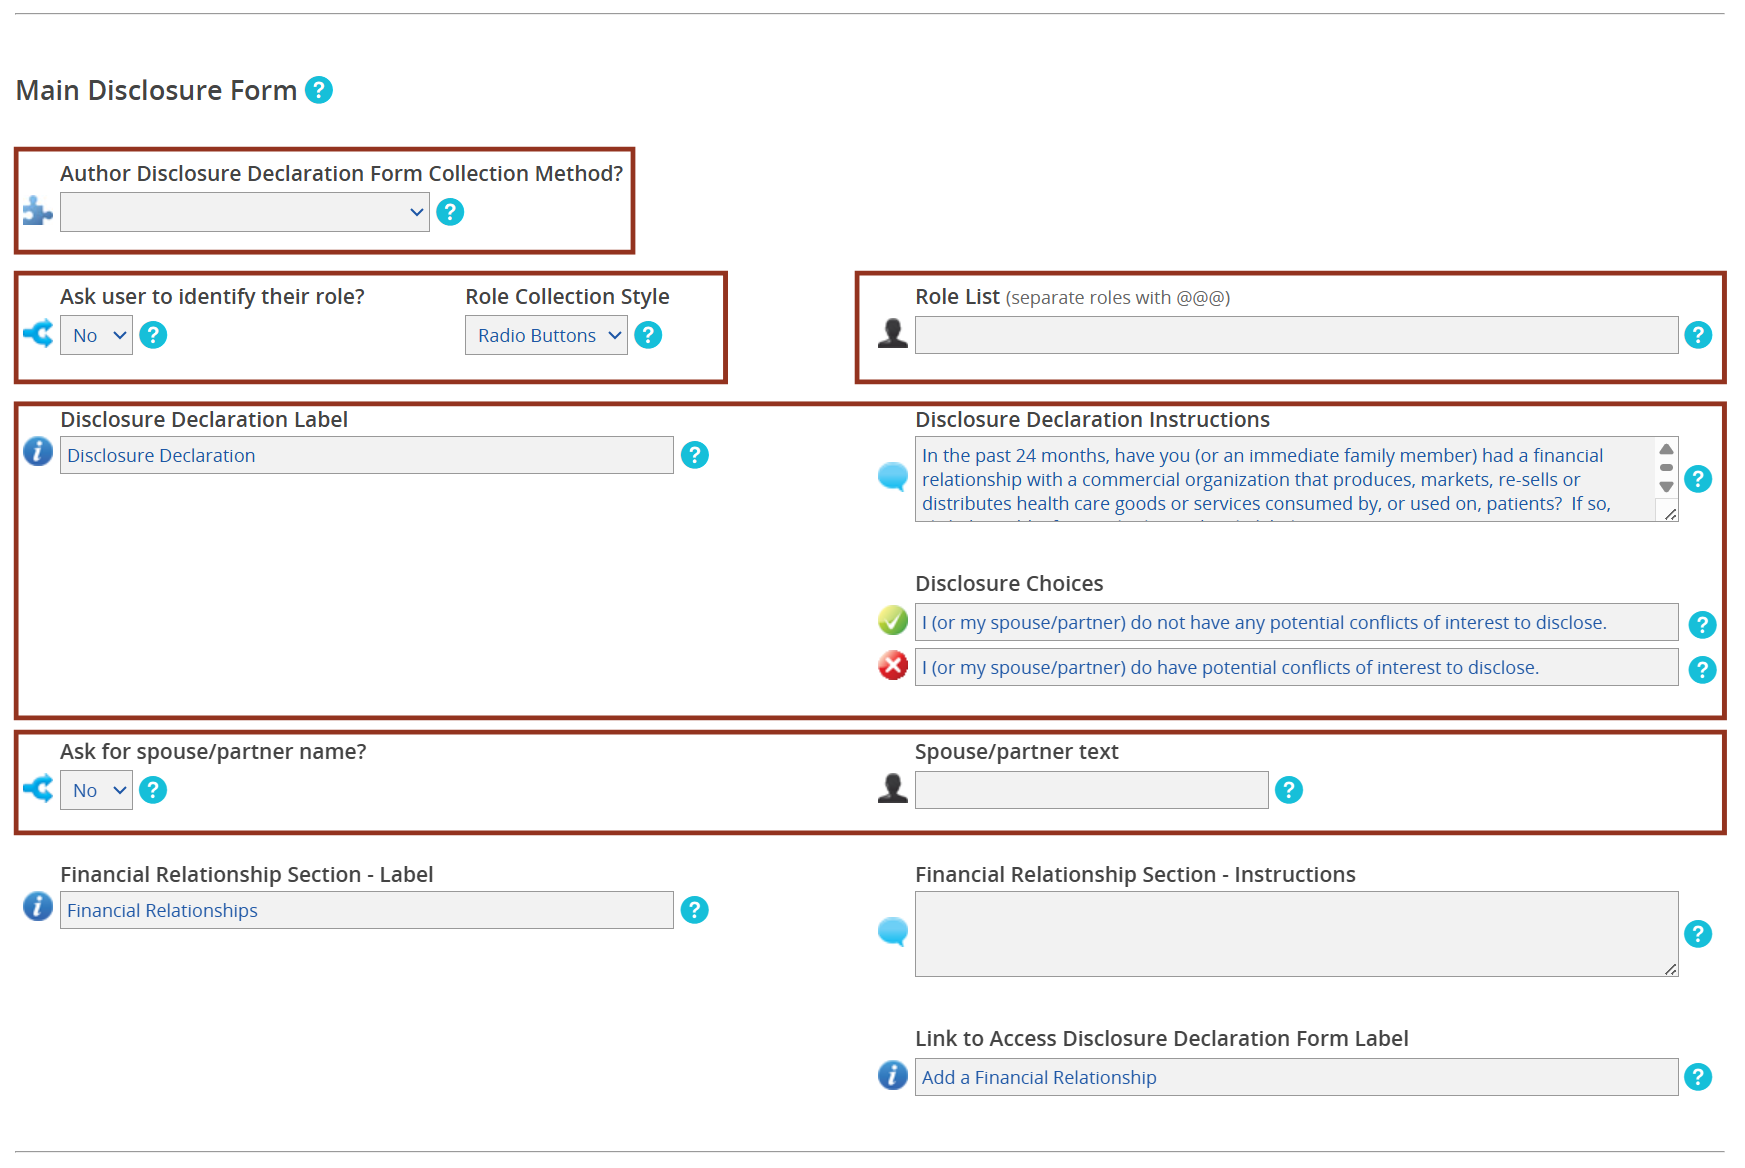
Configuring the Disclosure Declaration
- Navigate to Main Disclosure Form.
- Set Author Disclosure Collection Method:
- Each Author: Requires disclosure from all co-authors.
- Lead Author Only: Limits disclosure to the lead author.
- Enable role identification by toggling Ask user to identify their role to Yes.
- Select a Role Collection Style and, if necessary, add default available roles (Speaker, Planner, Review, and Manager) in the Role List box.
- Review the default Disclosure Declaration Instructions, Labels, and Choices and edit as needed.
NOTE
Ensure that any customized text in the Disclosure Choices boxes aligns with the icons: the text next to the green checkmark should indicate no financial relationships, while the text next to the red X should indicate existing financial relationships.
- To request a submitter’s spouse or partner's name when they declare relevant financial relationships, set the Ask for spouse/partner name? toggle to Yes and enter a label in the Spouse/partner text box.
Financial Relationship Details
This section of the form contains a button that directs users to the financial relationships page, where they can enter their relationships. Enter a label for this button in the Link to Access Disclosure Declaration Form Label box.
- Use the Financial Relationship Section – Label box to customize the label for the financial relationship section
- Use the Financial Relationship Section – Instruction box to enter instructions for financial relationships.

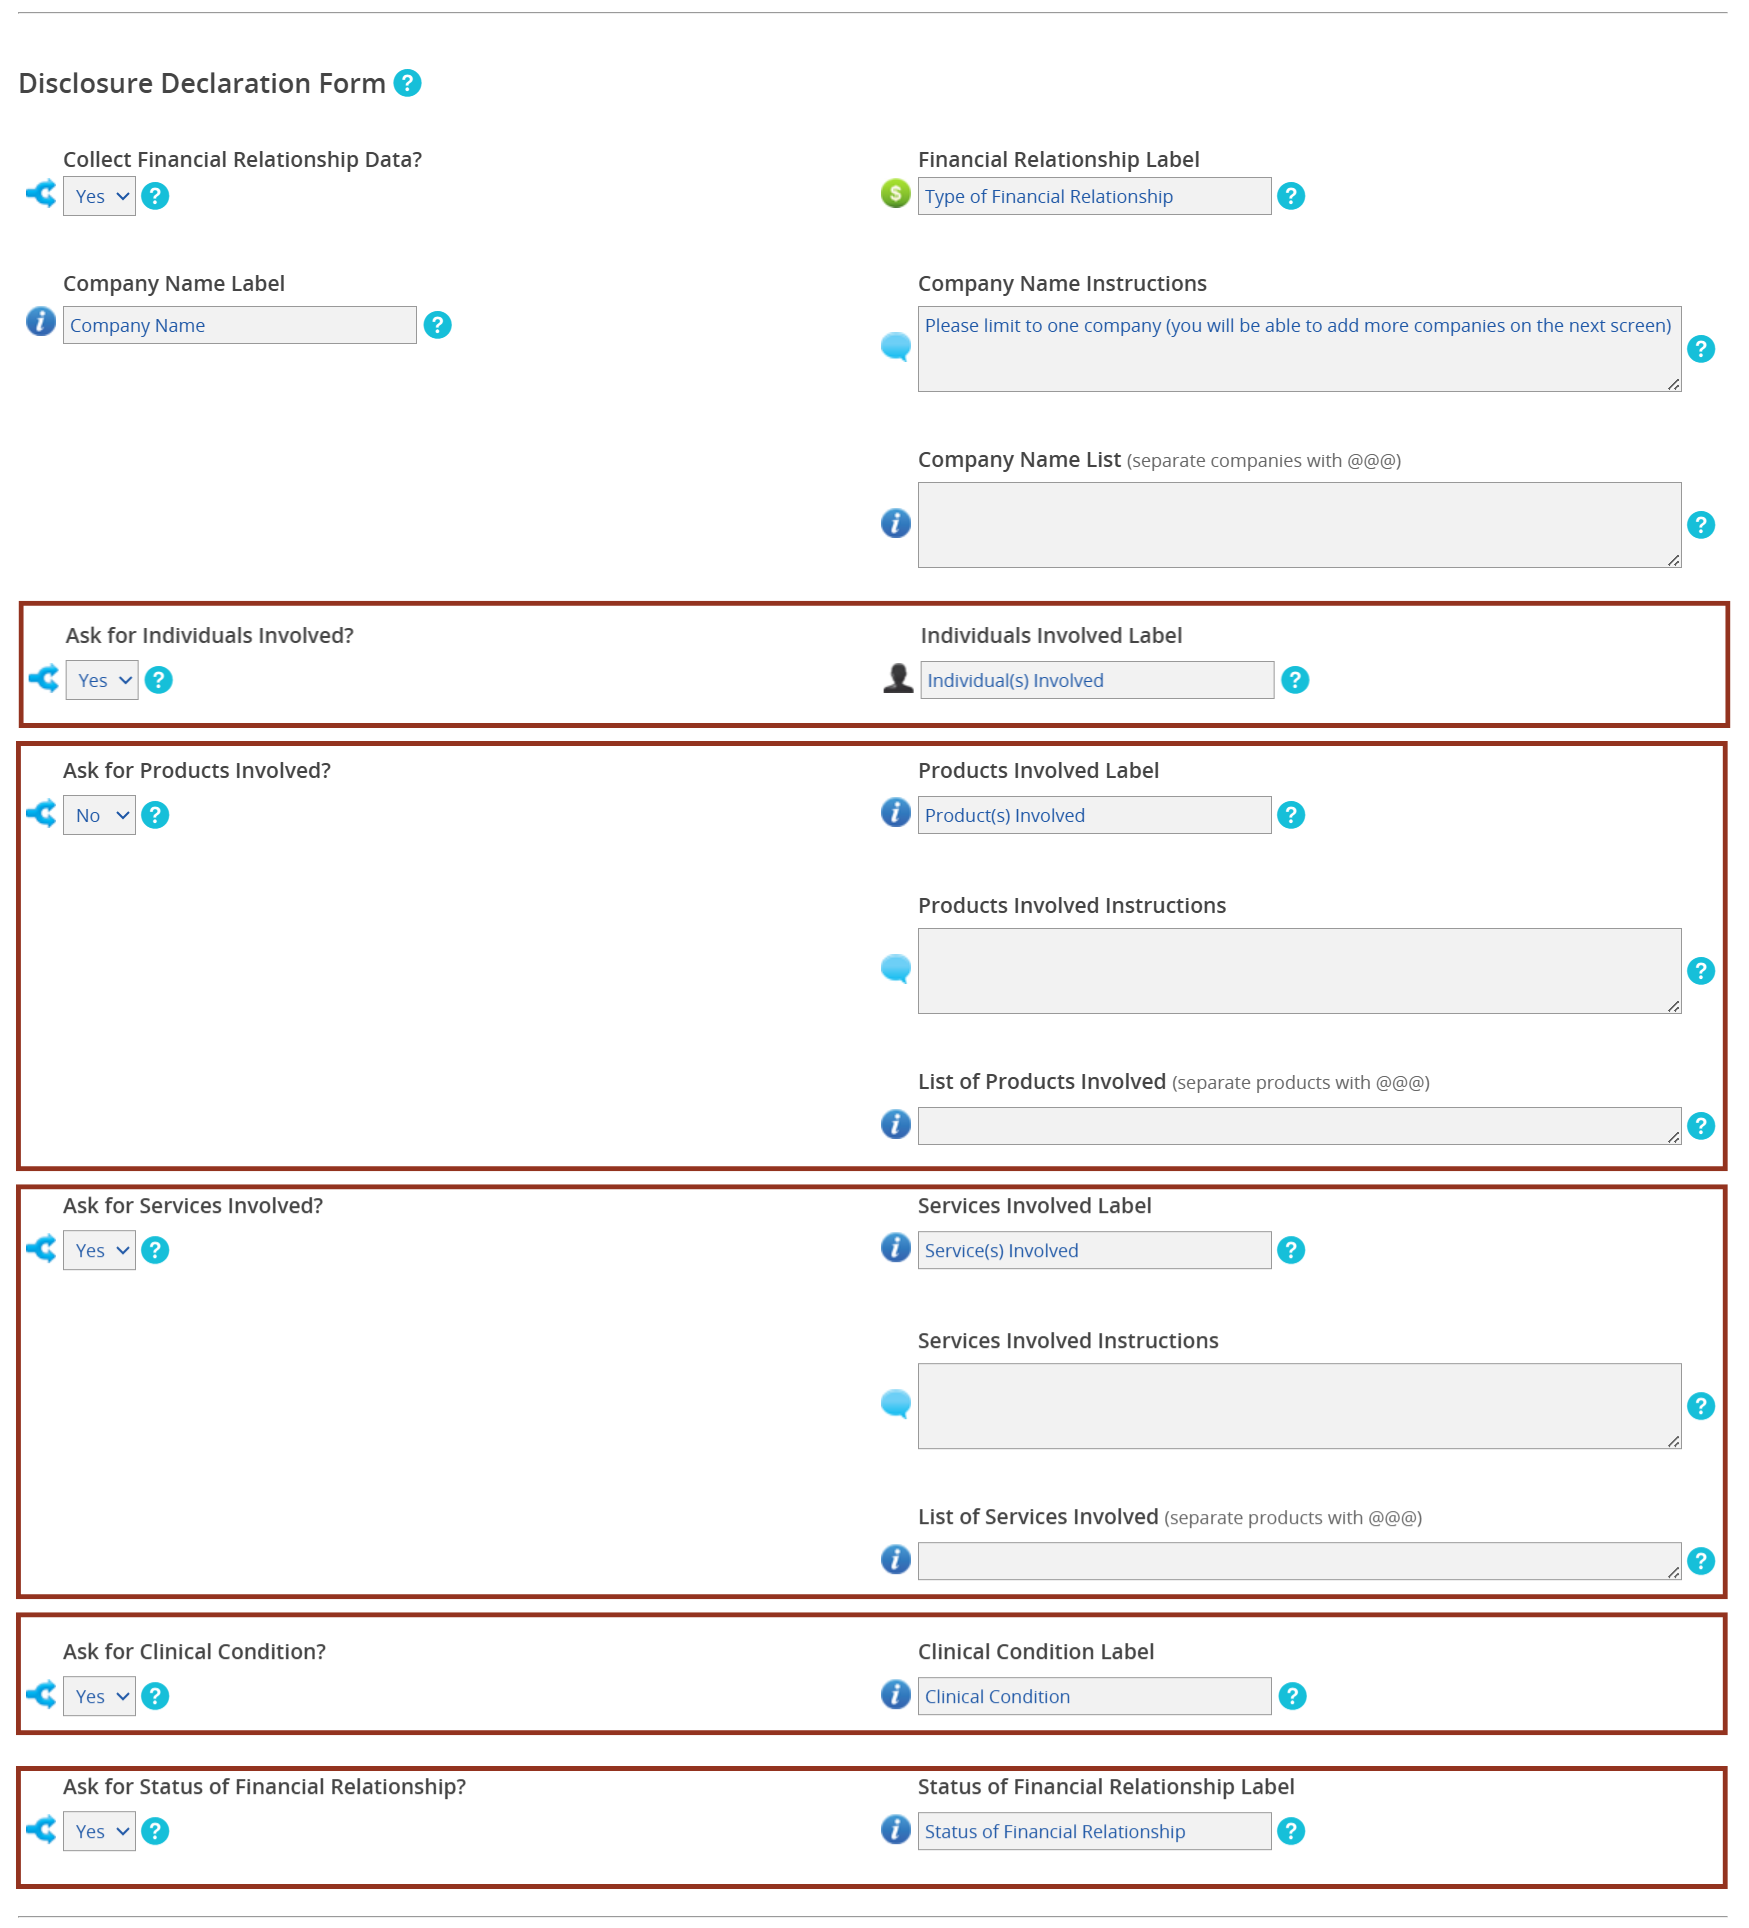
- To customize the financial relationship section, navigate to the Disclosure Declaration Form section in the task editor. Then, enter a label in the Financial Relationship Label box and another in the Company Name Label box.
- If needed, customize the text in the Company Name Instructions box and add company names to the Company List box. The names you provide will appear as suggestions when users enter company names.

- To configure relationship data collection, toggle the following settings to Yes and enter text in the corresponding label text boxes:
- Ask for Individual Involved? This allows you to ask for individuals involved in the financial relationship.
- Ask for Products Involved? This allows you to ask for the products involved in the financial relationship. Be sure to complete the Products Involved Instructions box and enter the products in the List of Products Involved box, if needed.
- Ask for Services Involved? This allows you to ask for the services involved in the financial relationship. Be sure to complete the Services Involved Instructions box and enter the products in the List of Services Involved box, if needed.
NOTE
If you provide a list, users will only be able to select from the products or Services you’ve entered.
- Ask for Clinical Condition? This allows you to ask for the clinical condition involved in the financial relationship.
- Ask for Status of Financial Relationship? This allows you to ask for the status of the financial relationship.
Adding Financial Relationships
- Select Add Financial Relationships from Library in the Financial Relationships setting of the task editor.

- This will display a pop-up with a list of all available relationships in your library. This list is shared across all your events. Use the check boxes to select the needed relationships and then select Add Relations to add them to the task.
- Use Manage Relationships to edit the relationships to your library.
- Hover over the document icon to view a description of the relationship.
- Use the trash can icon to remove relationships from your library
- Use the hamburger icon to move relationships in your library.

For additional information, please review the Adding Financial Relationships from Your Library help tip.
Additional Customization Options
The following optional elements can be added. Look for warnings in red under the question blocks to see which questions can be migrated to Education Harvester.
- Bias Question: Complete the Bias Question Title box and enter a Bias Question to collect bias-related disclosures.
- Off-Label Disclosures: Enter an Off-Label Disclosures Title and Question to prompt an author to answer questions about the off-label product disclosure if they select Add a New Item in their task.
- Treatment/Surgical Procedure Disclosures: Enter a Treatment/Surgical Procedure Disclosures Title, additional text, and up to two questions to collect procedure-related disclosures.
- Dropdown, Checkbox, and Freeform Questions: Add up to 10 of each type.
- Yes/No Questions: Add up to 8.
- Required Freeform Questions: Add up to 3, these questions can be hidden from reviewers, if desired.
- Required Freeform (if discloses) Questions: Add up to 5, these questions will be required for all users who have something to disclose. Use the Number of Required Questions setting to require these questions for all users regardless of their disclosure status.
- Attestation Statement: Choose an option in the Attestation Statement Options dropdown menu and enter an Attestation Statement Title, Text and up to 10 Questions in the appropriate text boxes. Some selections in the Attestation Statement Options menu may require users to acknowledge the questions you provide.
- Signature Requirement: Complete the Signature Box Text box and an optional Signature Box Disclaimer, if needed to require digital signatures before submission.
- Footer Statement: Complete the Footer Statement box to add a concluding statement below the signature line.
Finalizing and Testing the Task
- Scroll to the top of the Task Editor and select Update Task to save your configurations.
- Test the task from an author's perspective.
NOTE
If using multi-author completion, ensure multiple authors are added in the Author’s Task before testing the Disclosures Task.
If you encounter issues or have any questions, contact your Project Manager for assistance.
Last modified Sep 18, 2025
Was this article helpful?
That’s Great!
Thank you for your feedback
Sorry! We couldn't be helpful
Thank you for your feedback
Feedback sent
We appreciate your effort and will try to fix the article